Instructions on
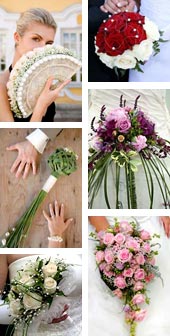
Do it Yourself Wedding Flowers
How to make an impressive wedding flower centerpiece.
|
|
|
|
Everything in this video is kept simple so that it's easy to follow. You can create your own gorgeous designs using the techniques you learn here.
An extravagant wedding flower arrangement is best left to the experienced wedding florist. The floral design instruction provided for you in the video's below are good for easy to moderately involved arrangements.
In this Video Tutorial Below: You will make a long oval shape wedding flower centerpiece. You choose your favourite flowers and just follow the simples steps. You can pause the video or restart at any time.
In this do it yourself wedding flowers video you will learn:
1. How to make a professional wedding flower centerpiece.
2. How to apply the principles involved in creating a large oval wedding flower arrangement.
3. How to prepare flowers so they look their best and last for the longest possible time.
4. How to trim and handle flowers so they are easy to work with.
5. How to use floral foam so that it creates a firm foundation for your design.
Video Narration: Further down below on this page we also have the written version of the narration of this diy wedding flowers video, for those of you who do not have sound on your computer or if you have a hearing impairment.
DIY Wedding Flowers Video
(Show Me How - Wedding Flowers DVD sample
- duration of video 9:32 minutes)
Below is the written narration
of this video with floral arranging instructions:
Do it yourself wedding flowers
Video Narration:
This oval design makes the ideal dinner table centerpiece, the arrangement is built from a central radiating point to a low height, so our guests see over the floral decoration. Complimentary flower colours and foilage textures combined with sunflowers gives this design impact and depth. Harmonious balance such as this is vital in an arrangement that will be viewed from all sides. You achieve this by rotating the arrangement as you work and check the overall elongated oval shape quickly.
1. Place the florist foam into the container and make a line about 50 mm above the edge, so you can cut it to the right height. Shave the top edges so you have the maximum area to put you foilage and flowers into.
2. Drop the block on top of the water which should be deeper than the height of the foam and let the water soak in. Don't hold it under or you might get air locks or air bubbles in the block which will reduce the life of the plants and display. Soaking takes about a minute, when it's completely soaked take your block out and place it back into the base container.
3. Tape the block and the base container from corner to corner using pot tape. Run the tape over and under, across diagonally and sticking the tape back onto itself so it sticks securely.
4. Using Rosemary to establish the displays outline, clean the leaves from the ends of the stem and strip off some of the bark so you can push the stem into the foam easily.
5. The first pieces goes into the shorter side of the foam. Measure another piece of Rosemary to the first length and insert it opposite the other end. These first two pieces set the length of the long axis of the oval. Make sure the stems angle down towards the table, this will help hide your container.
6. The next two pieces are put into the front side of the design, these mustn't be too long because they define the shorter axis of the oval. Again, angle the stems down towards the table.
7. Now put a new longish piece into the design, it goes into place along side the first piece but is slightly shorter, match that with another diagonally opposite. The next piece which goes on the other side near the first piece will be shorter still. Place another stem the same length diagonally opposite it.
8. Position a piece upright in the centre of the cross shape to set the height. This mustn't be too tall, because your going to use this as a centre table display. Then above your first line of your first line of plant material insert a slightly shorter piece, which will help give the profile. Now carry on around the container at the lowest level to set the outine of the face of the design.
9. Now add in some Conifer. This is going to help make the outline be more solid. It also helps to cover your container. Cut the pieces of Conifer to to similar lengths or slightly shorter than the Rosemary, to insert along side the Rosemary pieces. Strip the foliage off the bottom of the Conifer so the stems are nice and clean and cut the stems at an angle to make insertion easier.
10. Continue adding bulk and height to the design with bushy shiny leaf Verburnum. Cut several different lengths of Verburnum in advance including some shorter pieces to use towards the centre of the design. Insert them between the pieces of Rosemary and conifer. You can enhance the colour scheme by leaving some of the flowers on the Verburnum. Place it right the way through the length of the design, this not only helps to fill it out but also adds a different texture.
Eucalyptus is a similar shape leaf to the Verburnum. It adds some more matt texture. Work pieces of Eucalyptus through the design in the same manner as for the Verburnum, adding to the front and back as well as the central part of the design. Use Begonia leaves to serve as a guide for placement of the focal flowers. Run these focal point leaves through the design in a zig zag. Bogania has a softish stem, so it needs to be pushed in from the base of the stem.
11. The first flowers are cream Lisianthus. Remove some of the lower leaves and snip off lengths of blooms known as breaks to use. Measure the stems as you go and stagger them through the design in a zig zig either side of the long axis.
12. Measuring stems as you go, add Tulips through the length of the design in a zig zag pattern, either side of the long axis at quit a low angle but within the foliage outline. Support the stem when you're removing Tulip leaves because you could break the stem at the point were the leaf is joined. Push the stems in at a low angle within the foliage outline supporting them as necessary and holding them close to the base of the stem so to avoid breaking them.
13. The largest blooms, the Sunflowers go into the middle of the design. Place the central bloom first then add others following the pattern of the Bogania leaves you inserted earlier. The central top flower is slightly proud of the foliage outline but not so high up that the stem can be seen. Trim off the lower leaves and remove any leaves that have holes in them. Cut the stems short and set the flowers in place in a zig zag pattern established earlier.
14. When you've placed your main flowers, you can see were there is still spaces. Additonal tulips can add extra colour and help unify the design.
15. Now put in some Freesia's to finish off. Use these right the way through the middle in between the Tulips, some of the little buds look good too. Remove any damaged blooms and run the Freesia's through the design so that you have an even spread of them and continue to look for gaps which you can plug. Make sure the design is well balanced, moving blooms as necessary but don't over crowd the display. More Lisianthus can also help fill in any bare regions but don't over do it because you want the Sunflowers surrounded by your other blooms and carefully built up foliage to make a strong statement.
16. Remember to water the finished arrangement everyday so it will last as long as possible.
These are the materials used
for this do it yourself wedding flowers video:
1. Florist base container
2. Florist foam
3. Florist tape
4. A bowl of water
5. A knife to cut florist foam
6. Clippers to cut the flower stems
7. Bunch of Rosemary
8. Conifer leaves
9. Verburnum leaves
10. Eucalyptus leaves
11. Cream Lisianthus
12. Bunch of Tulips
13. Bunch of Sunflowers
14. Bunch of Freesia flowers

![]()
VIDEO TUTORIALS:
|
1. Make a Large Wedding Flower Centerpiece:
|
2. How to Make Your Own Bridal Bouquet:
|
3. Make a Hand Tied Calla Lily Bouquet:
|
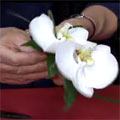
4. How to Make a White Orchid Corsage:This simple
|
5. How to Make a Wedding Candle Centerpiece:
|
6. Make a Pomander Flower Ball Centerpiece:
|
7. How to Arrange Flowers For a Small Vase:
|
8. How to Make a Boutonniere:
|


![]()
|
|